Unifi Video + Intel NUC
My latest project is setting up an Intel NUC with Unifi Video for a family member who had a cheap camera recently die.
This post will show some of the interesting specifics, but is not a A-Z guide. This project has a few requirements:
- Lowest price possible
- Unifi Video + Ubiquiti cameras
- Small power usage and physical footprint
I decided to go with the Intel NUC because it covers all of the requirements and I’ve used them before for “Production” applications with great success.
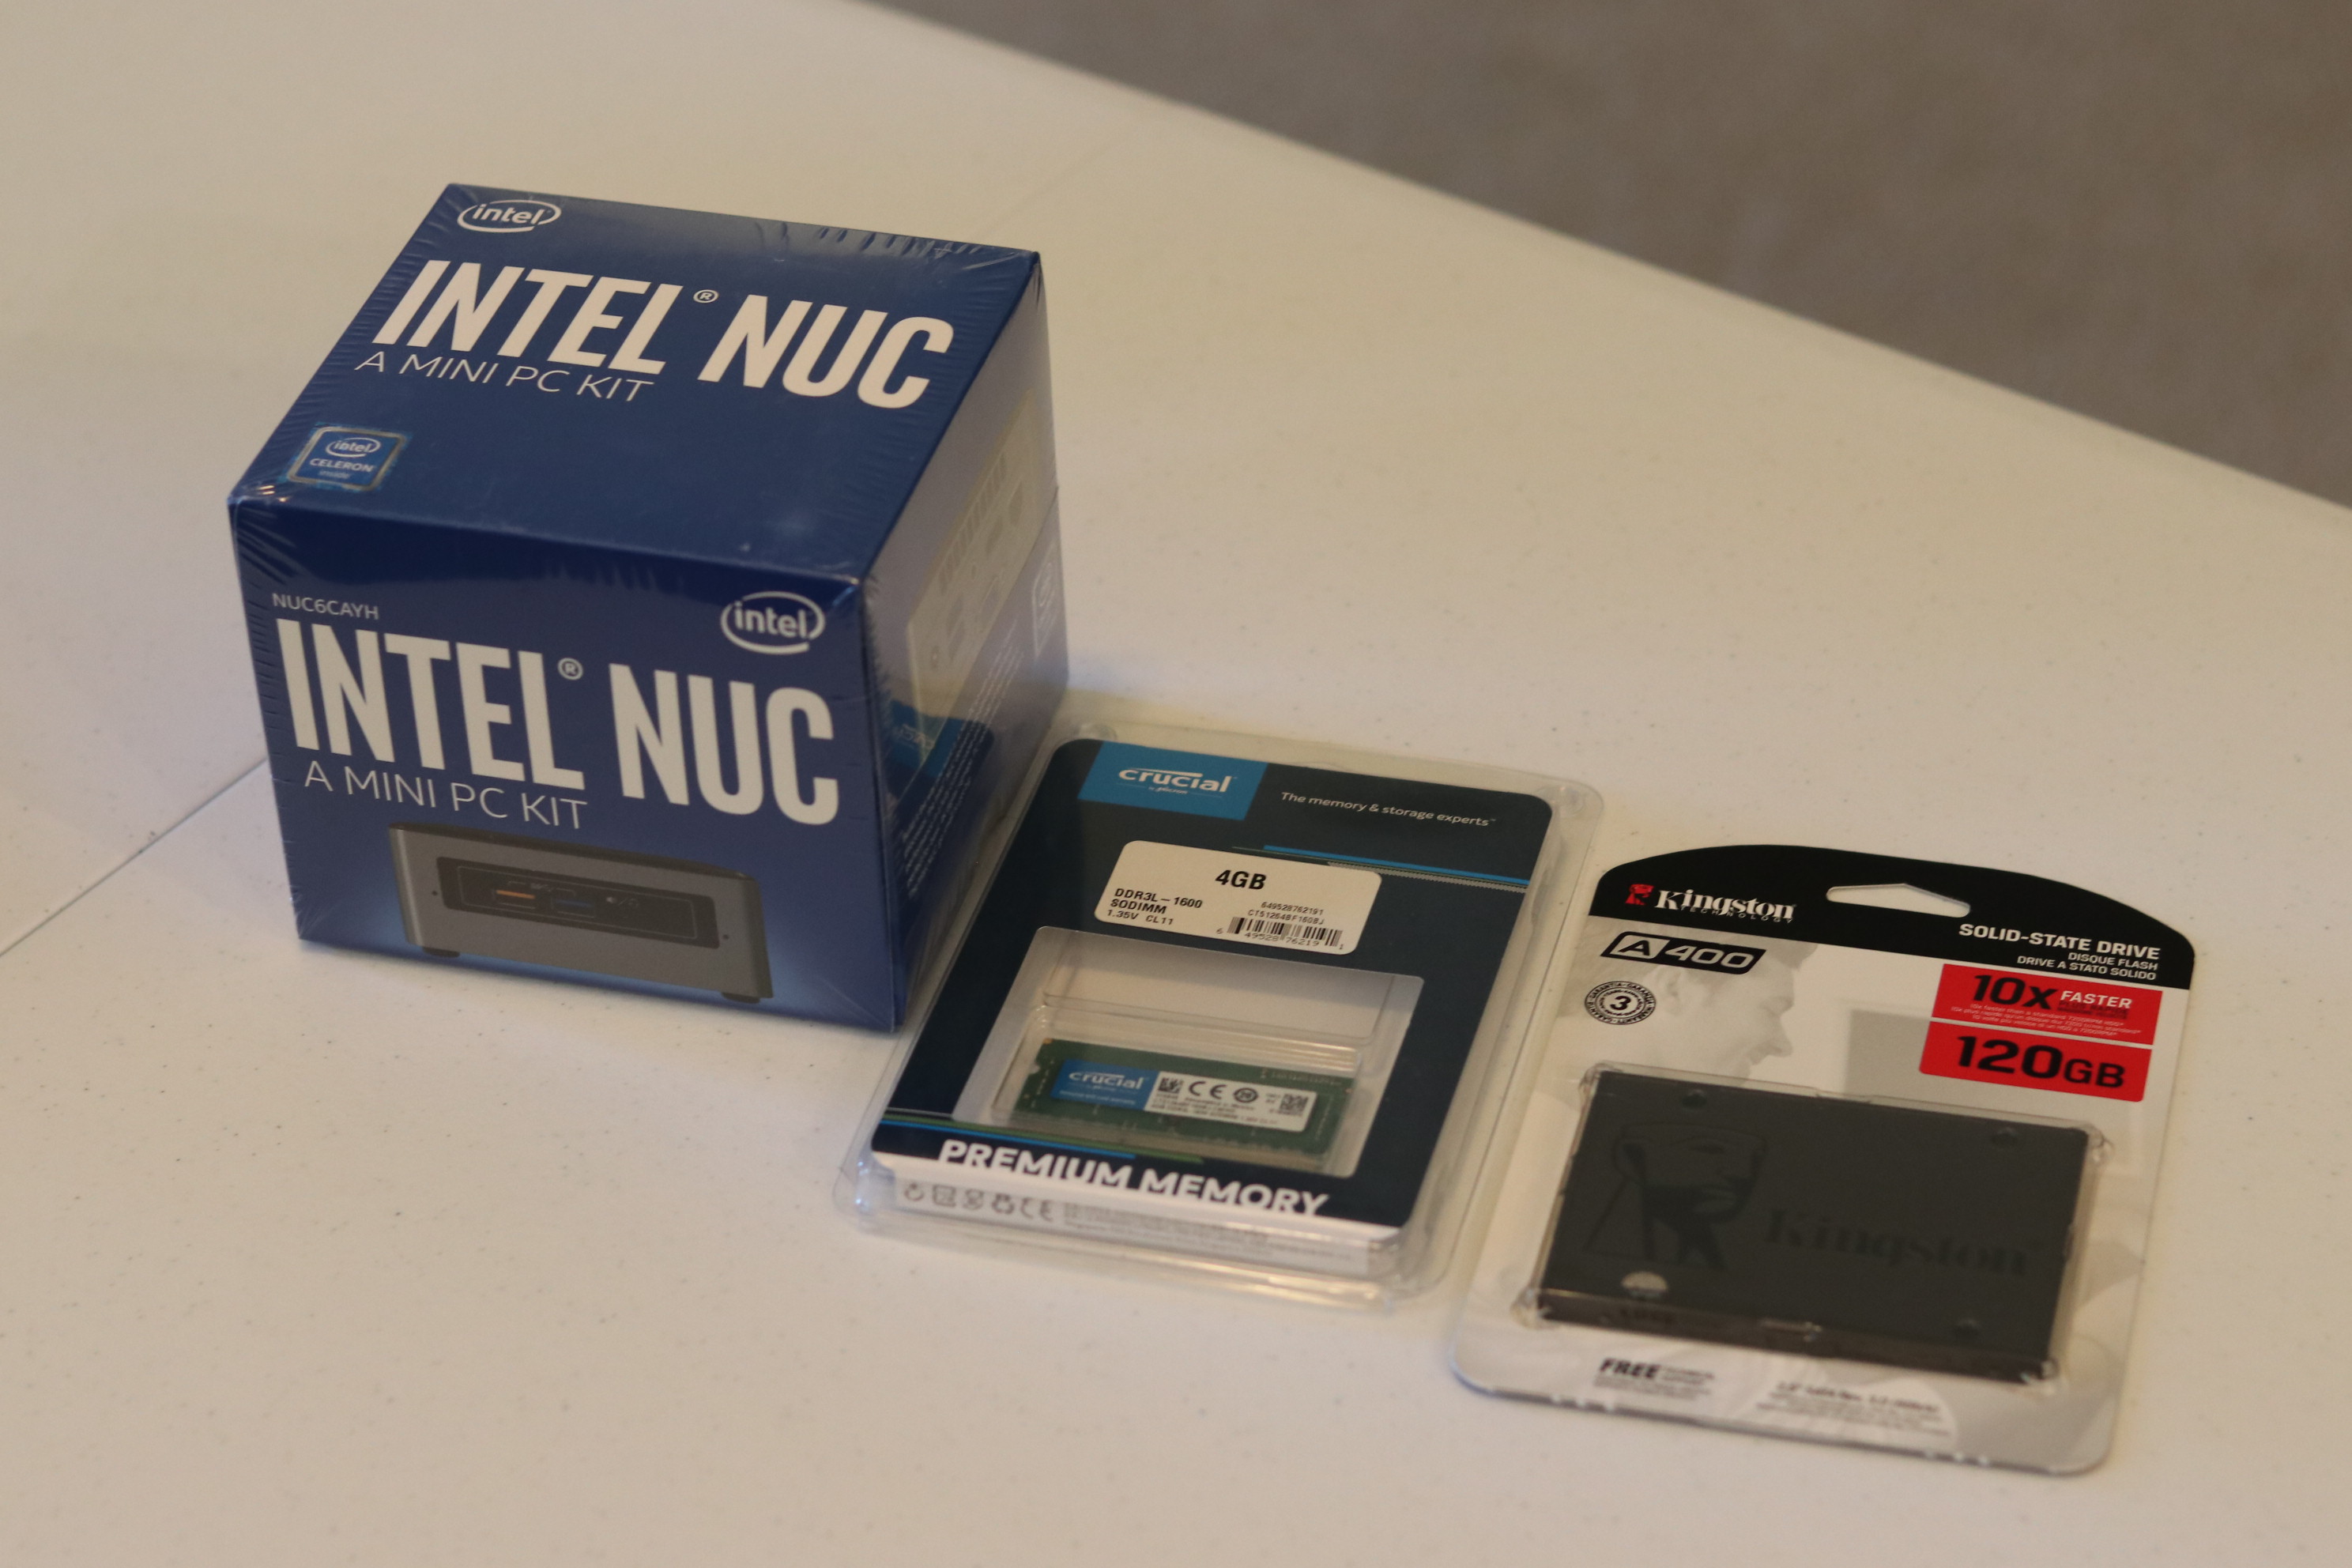
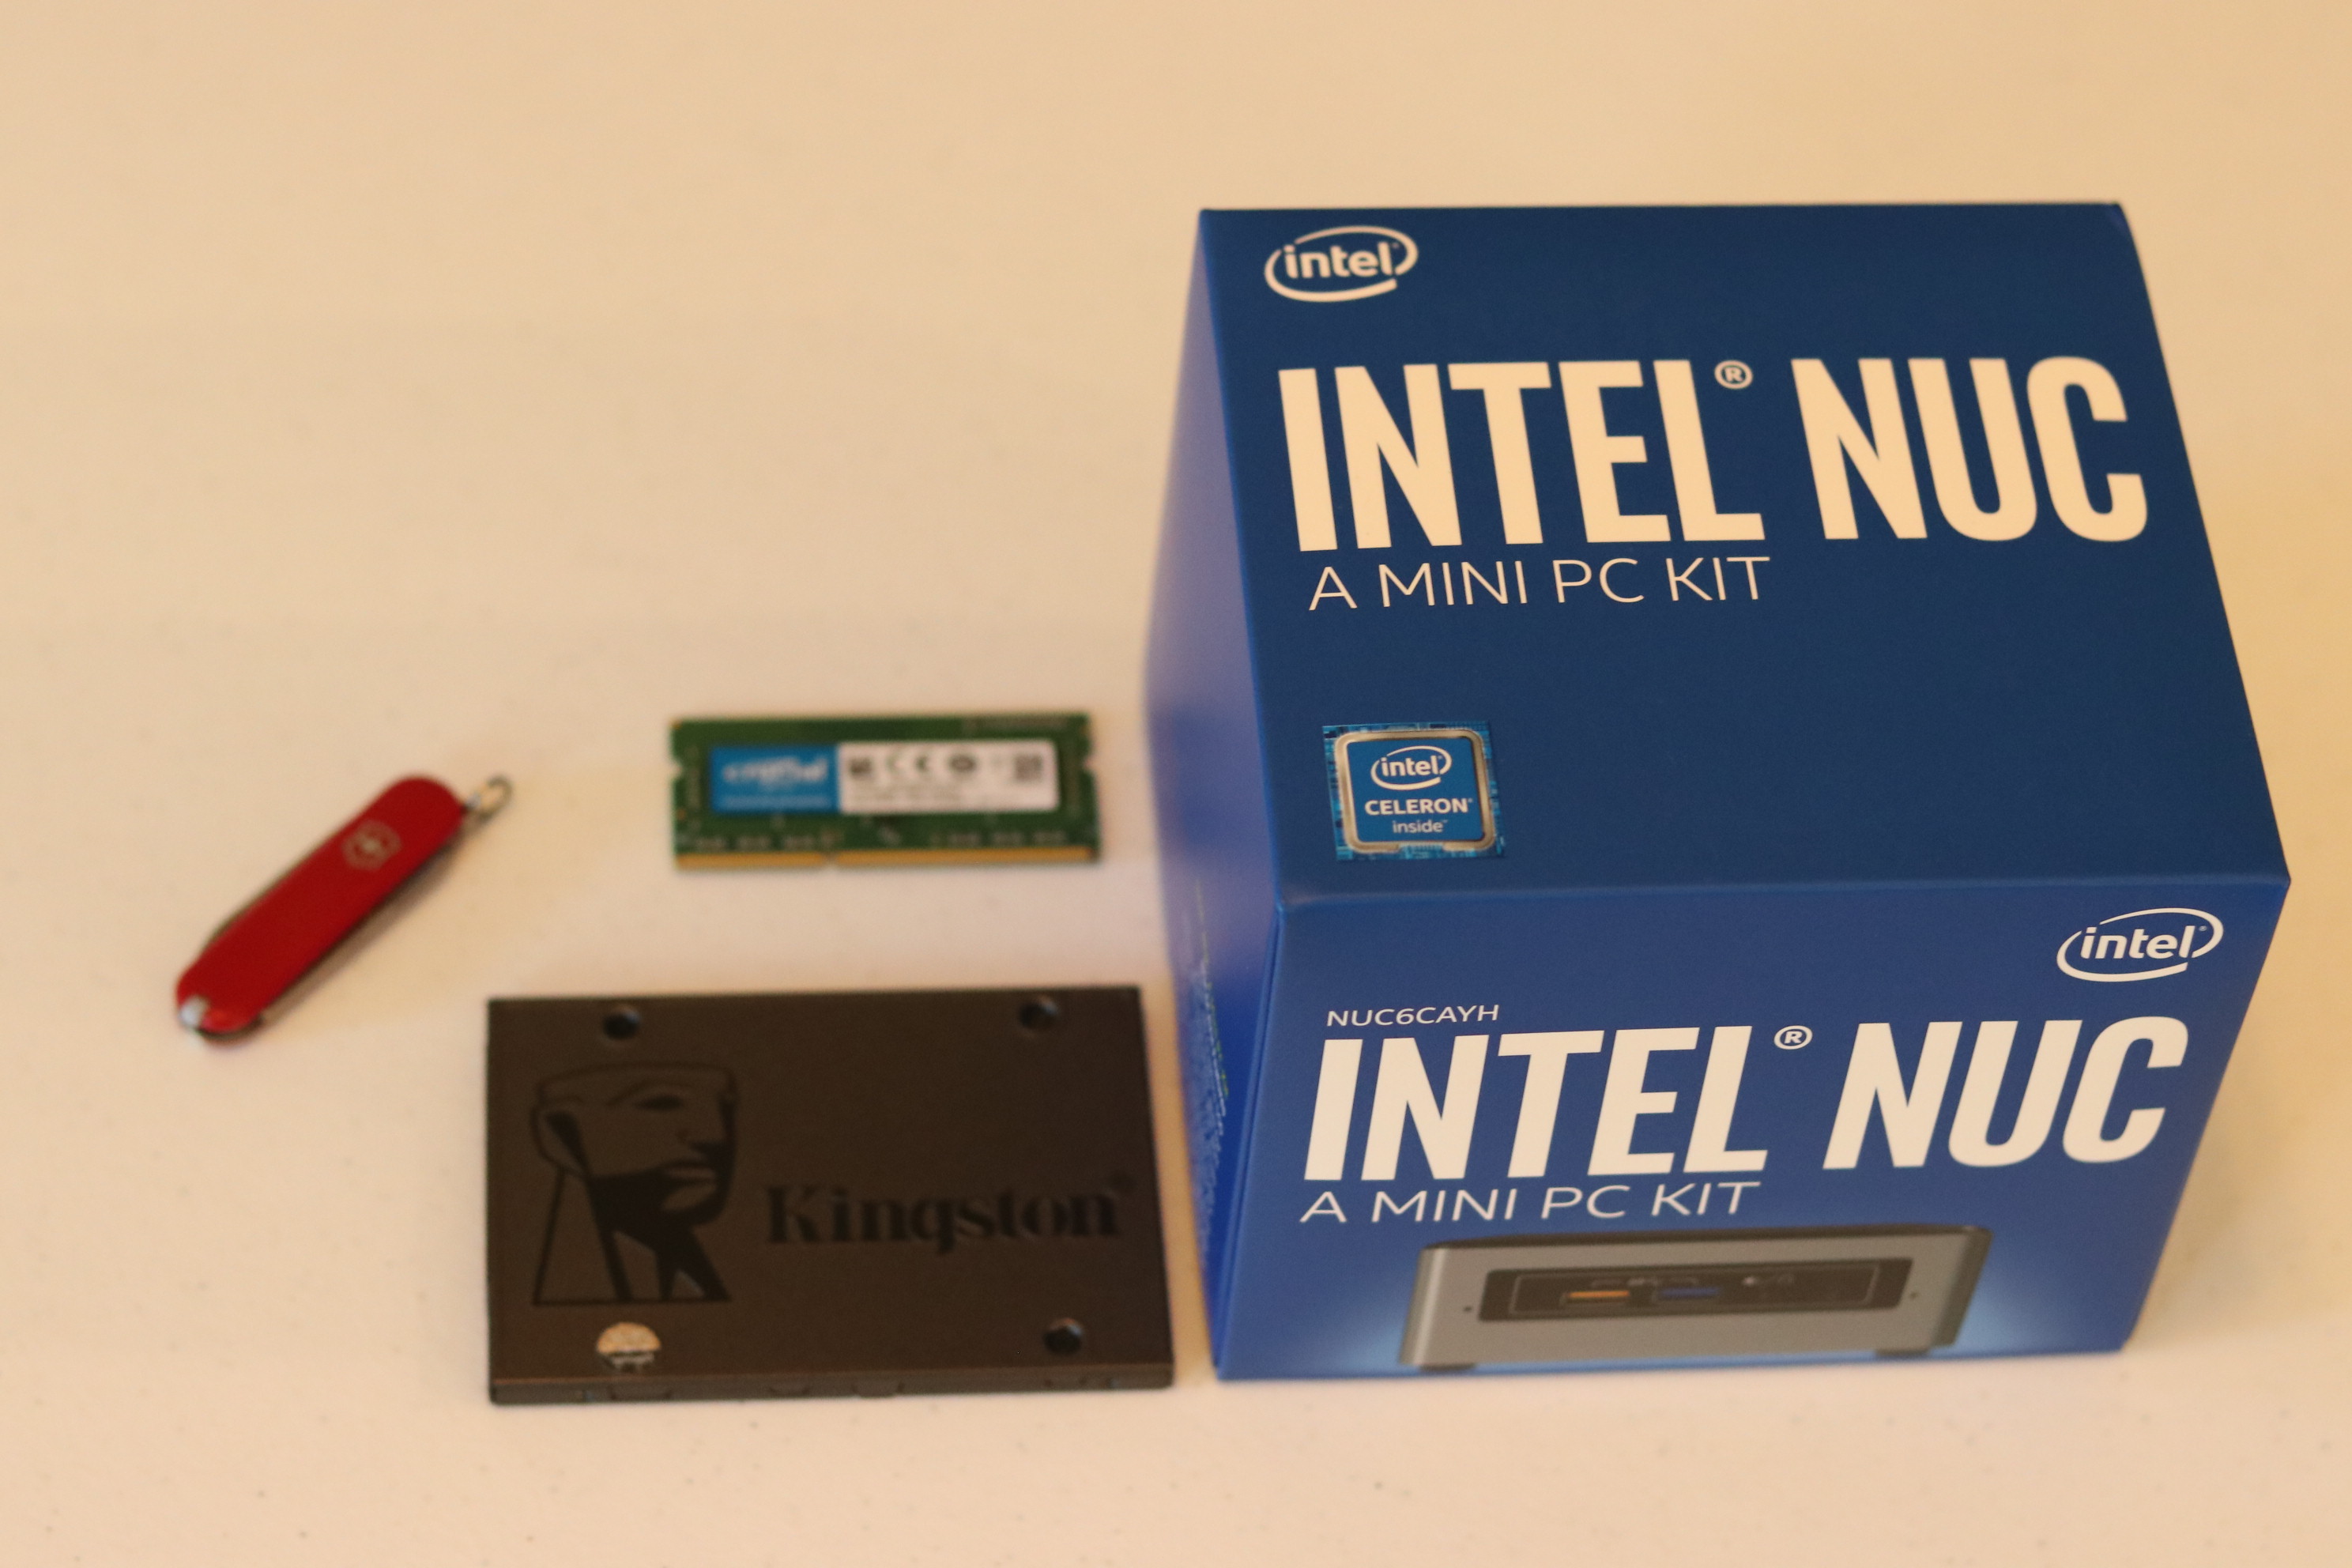
Parts List (no I don’t use referral Amazon URLs):
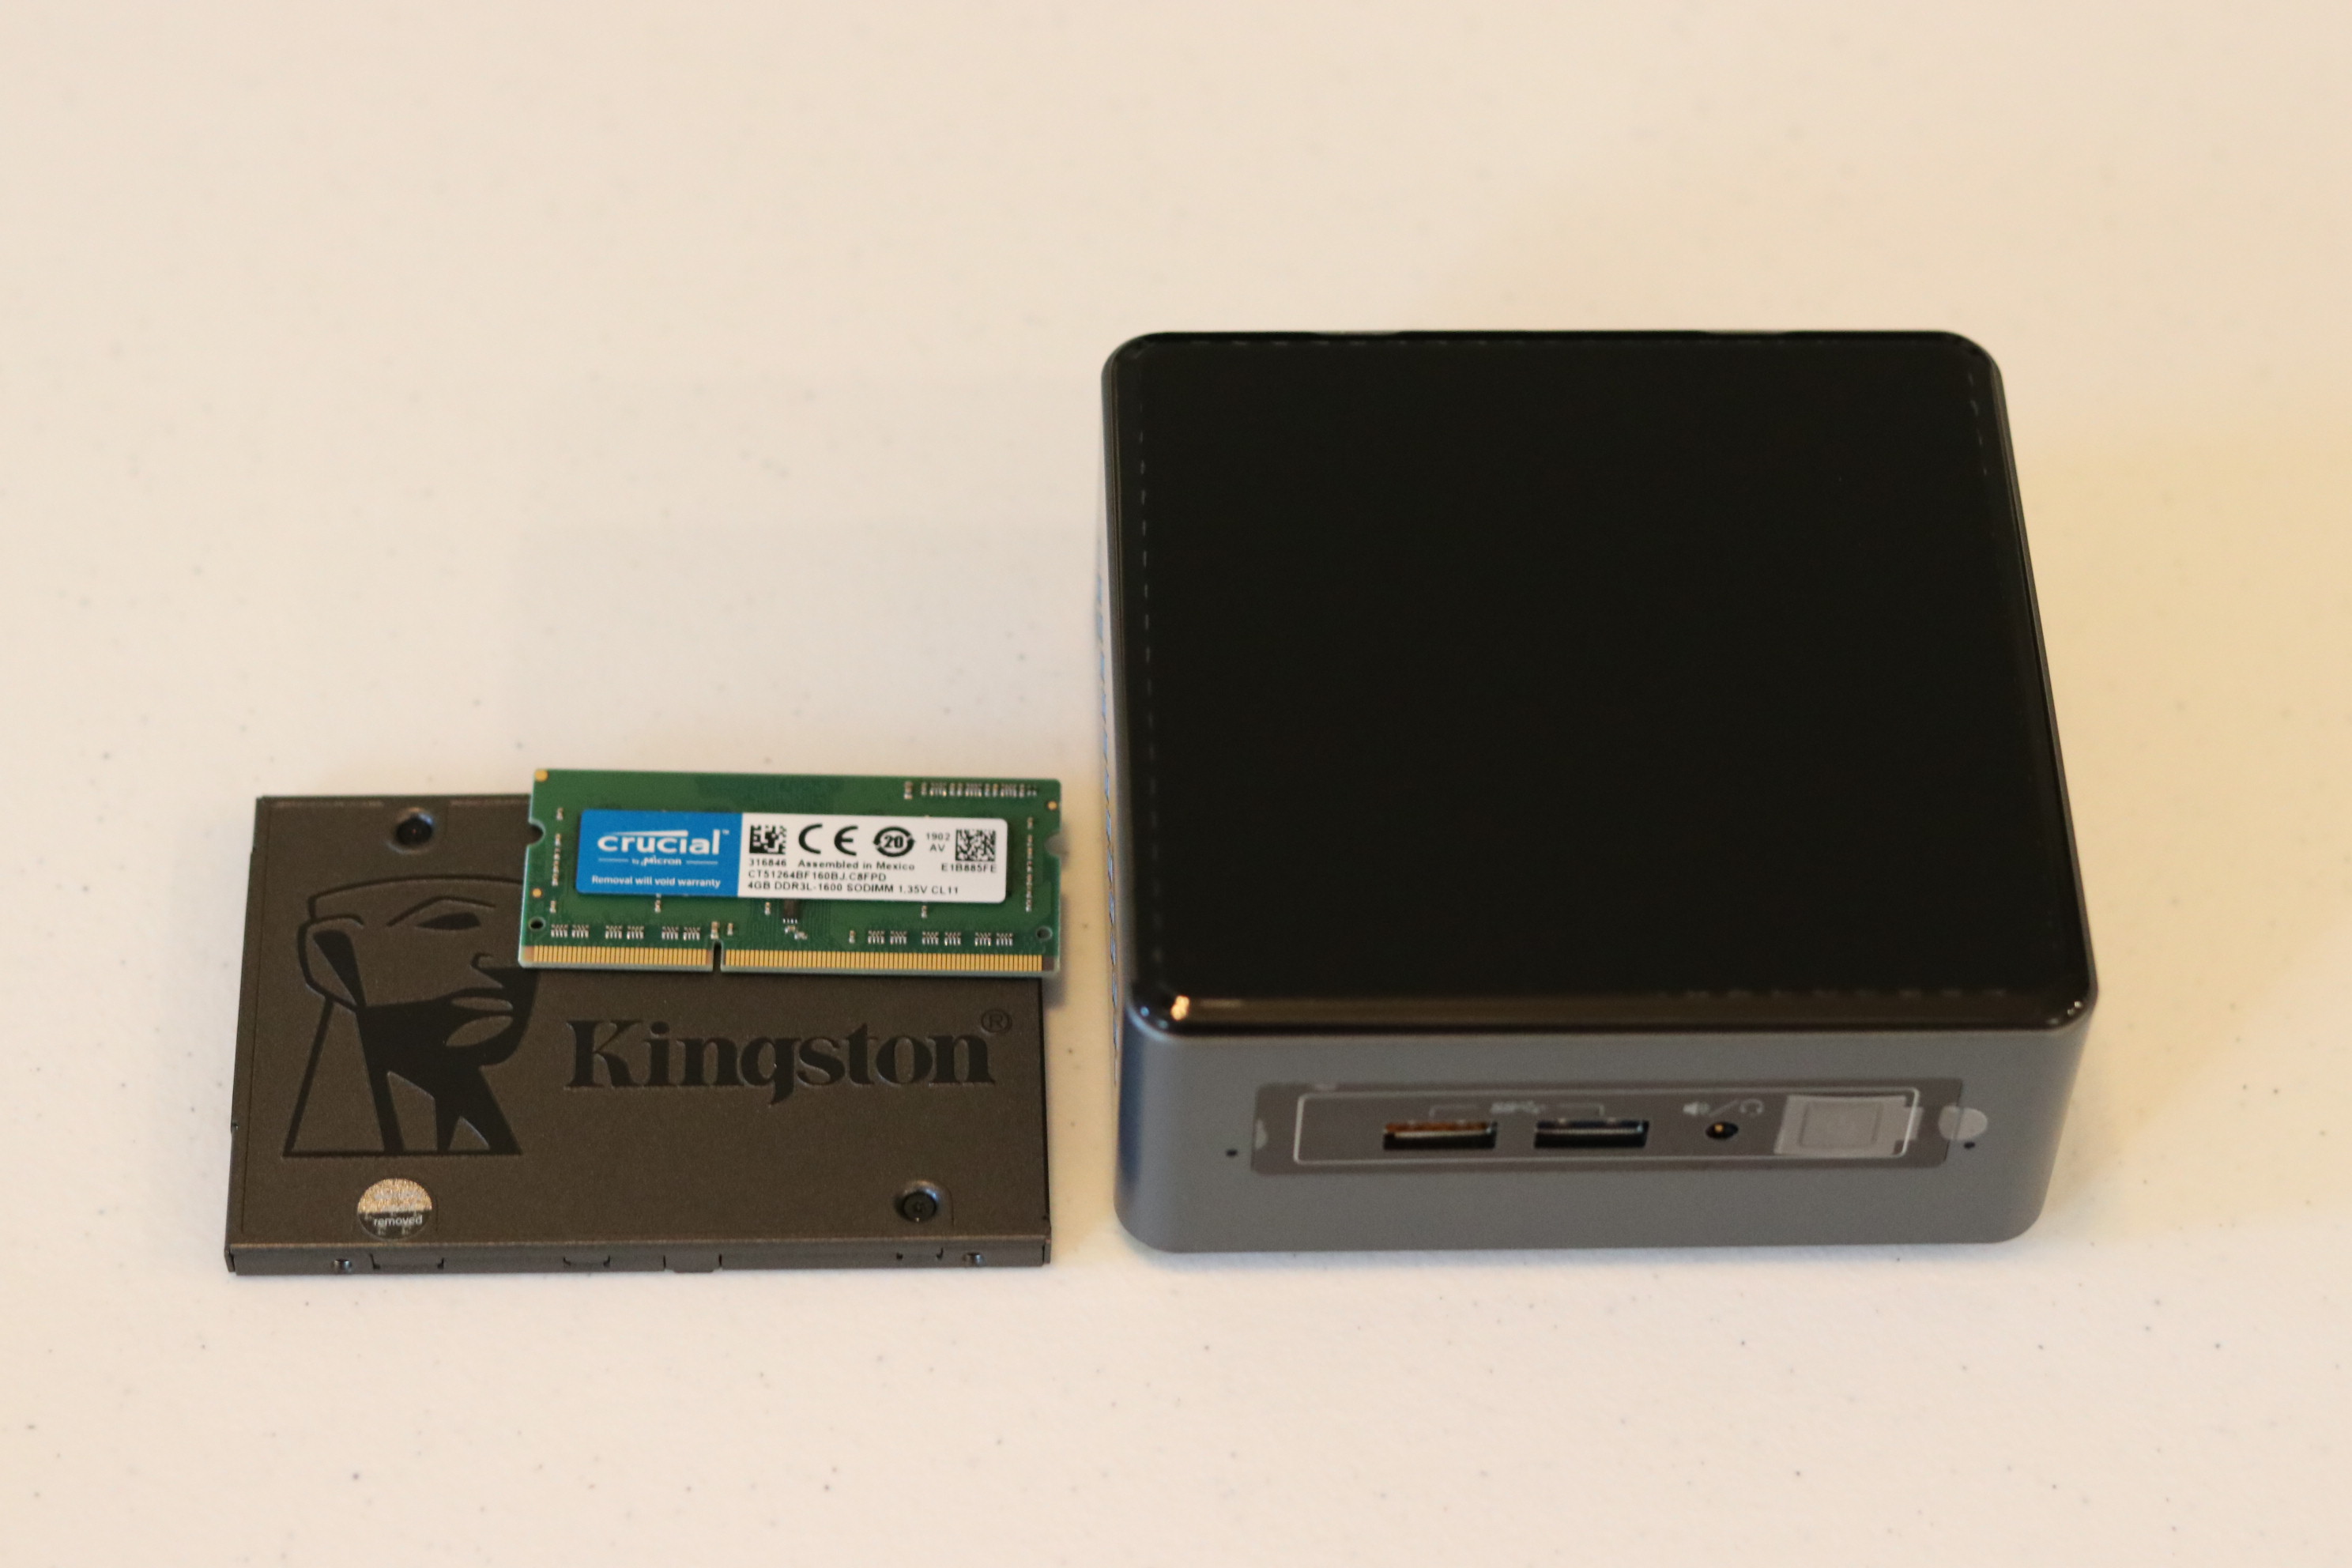
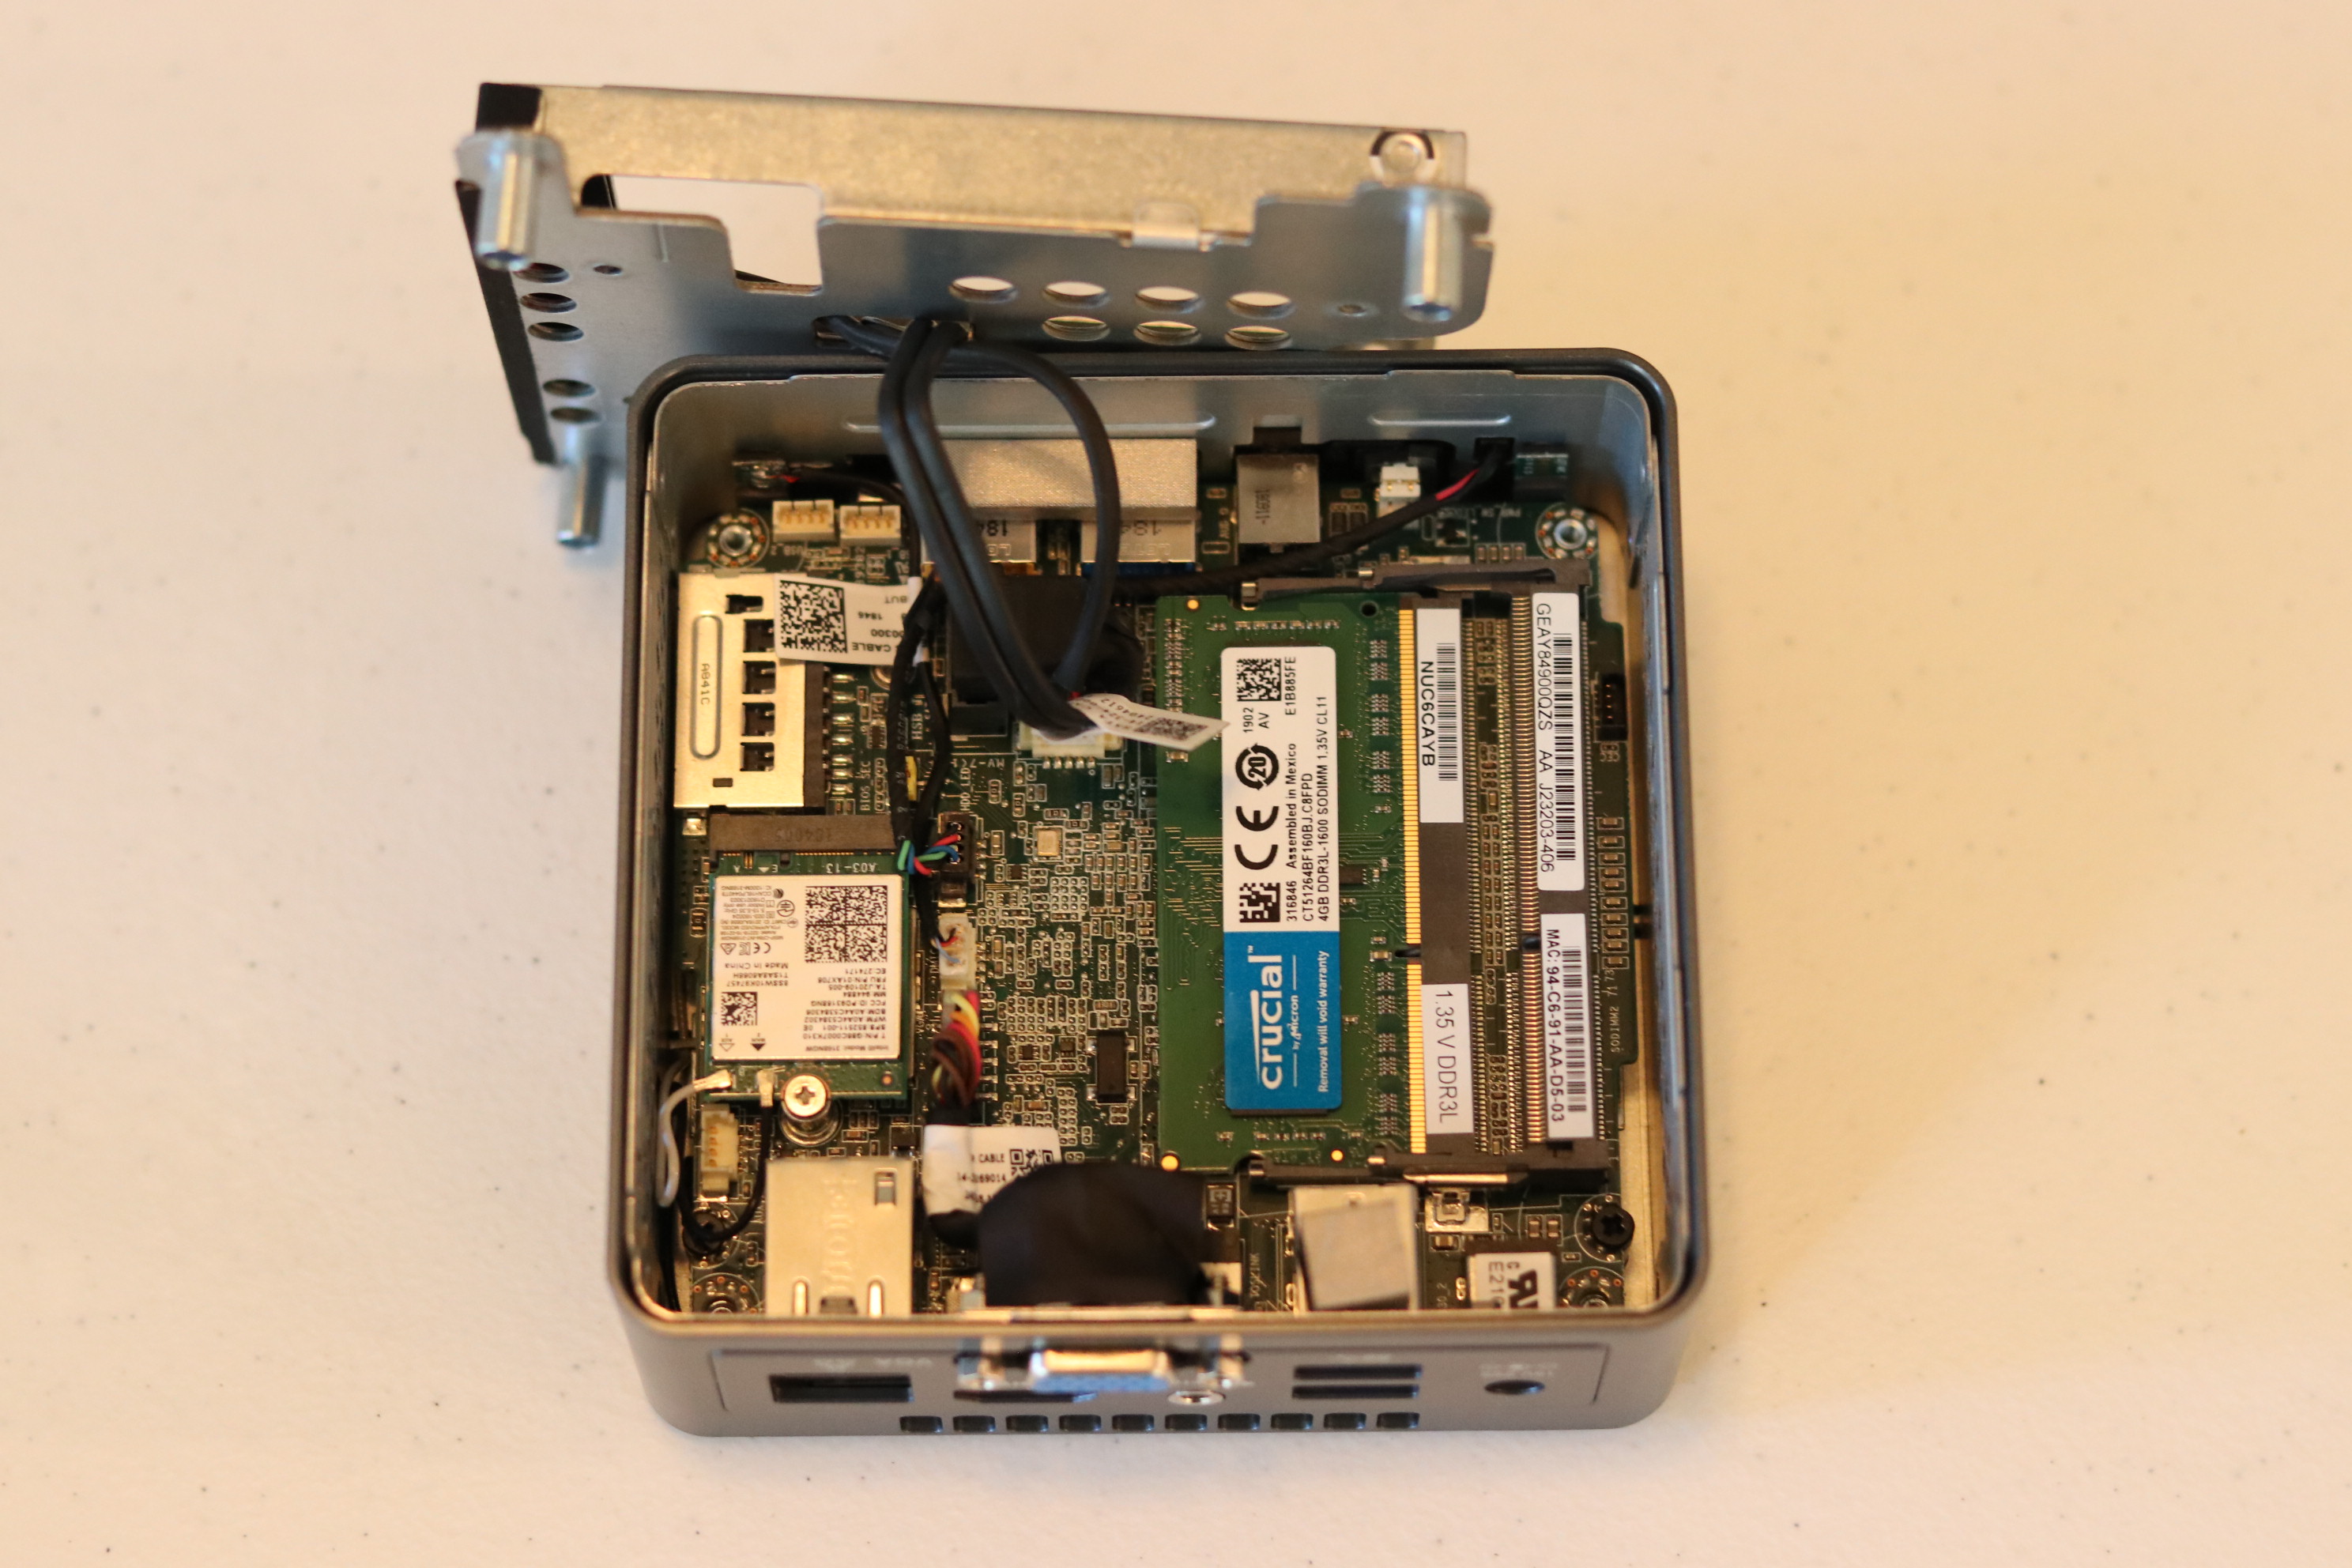
- Intel NUC 6 Essential Kit (NUC6CAYH) – $128 (Amazon)
- Crucial 4GB (CT51264BF160BJ) – $24.95 (Amazon)
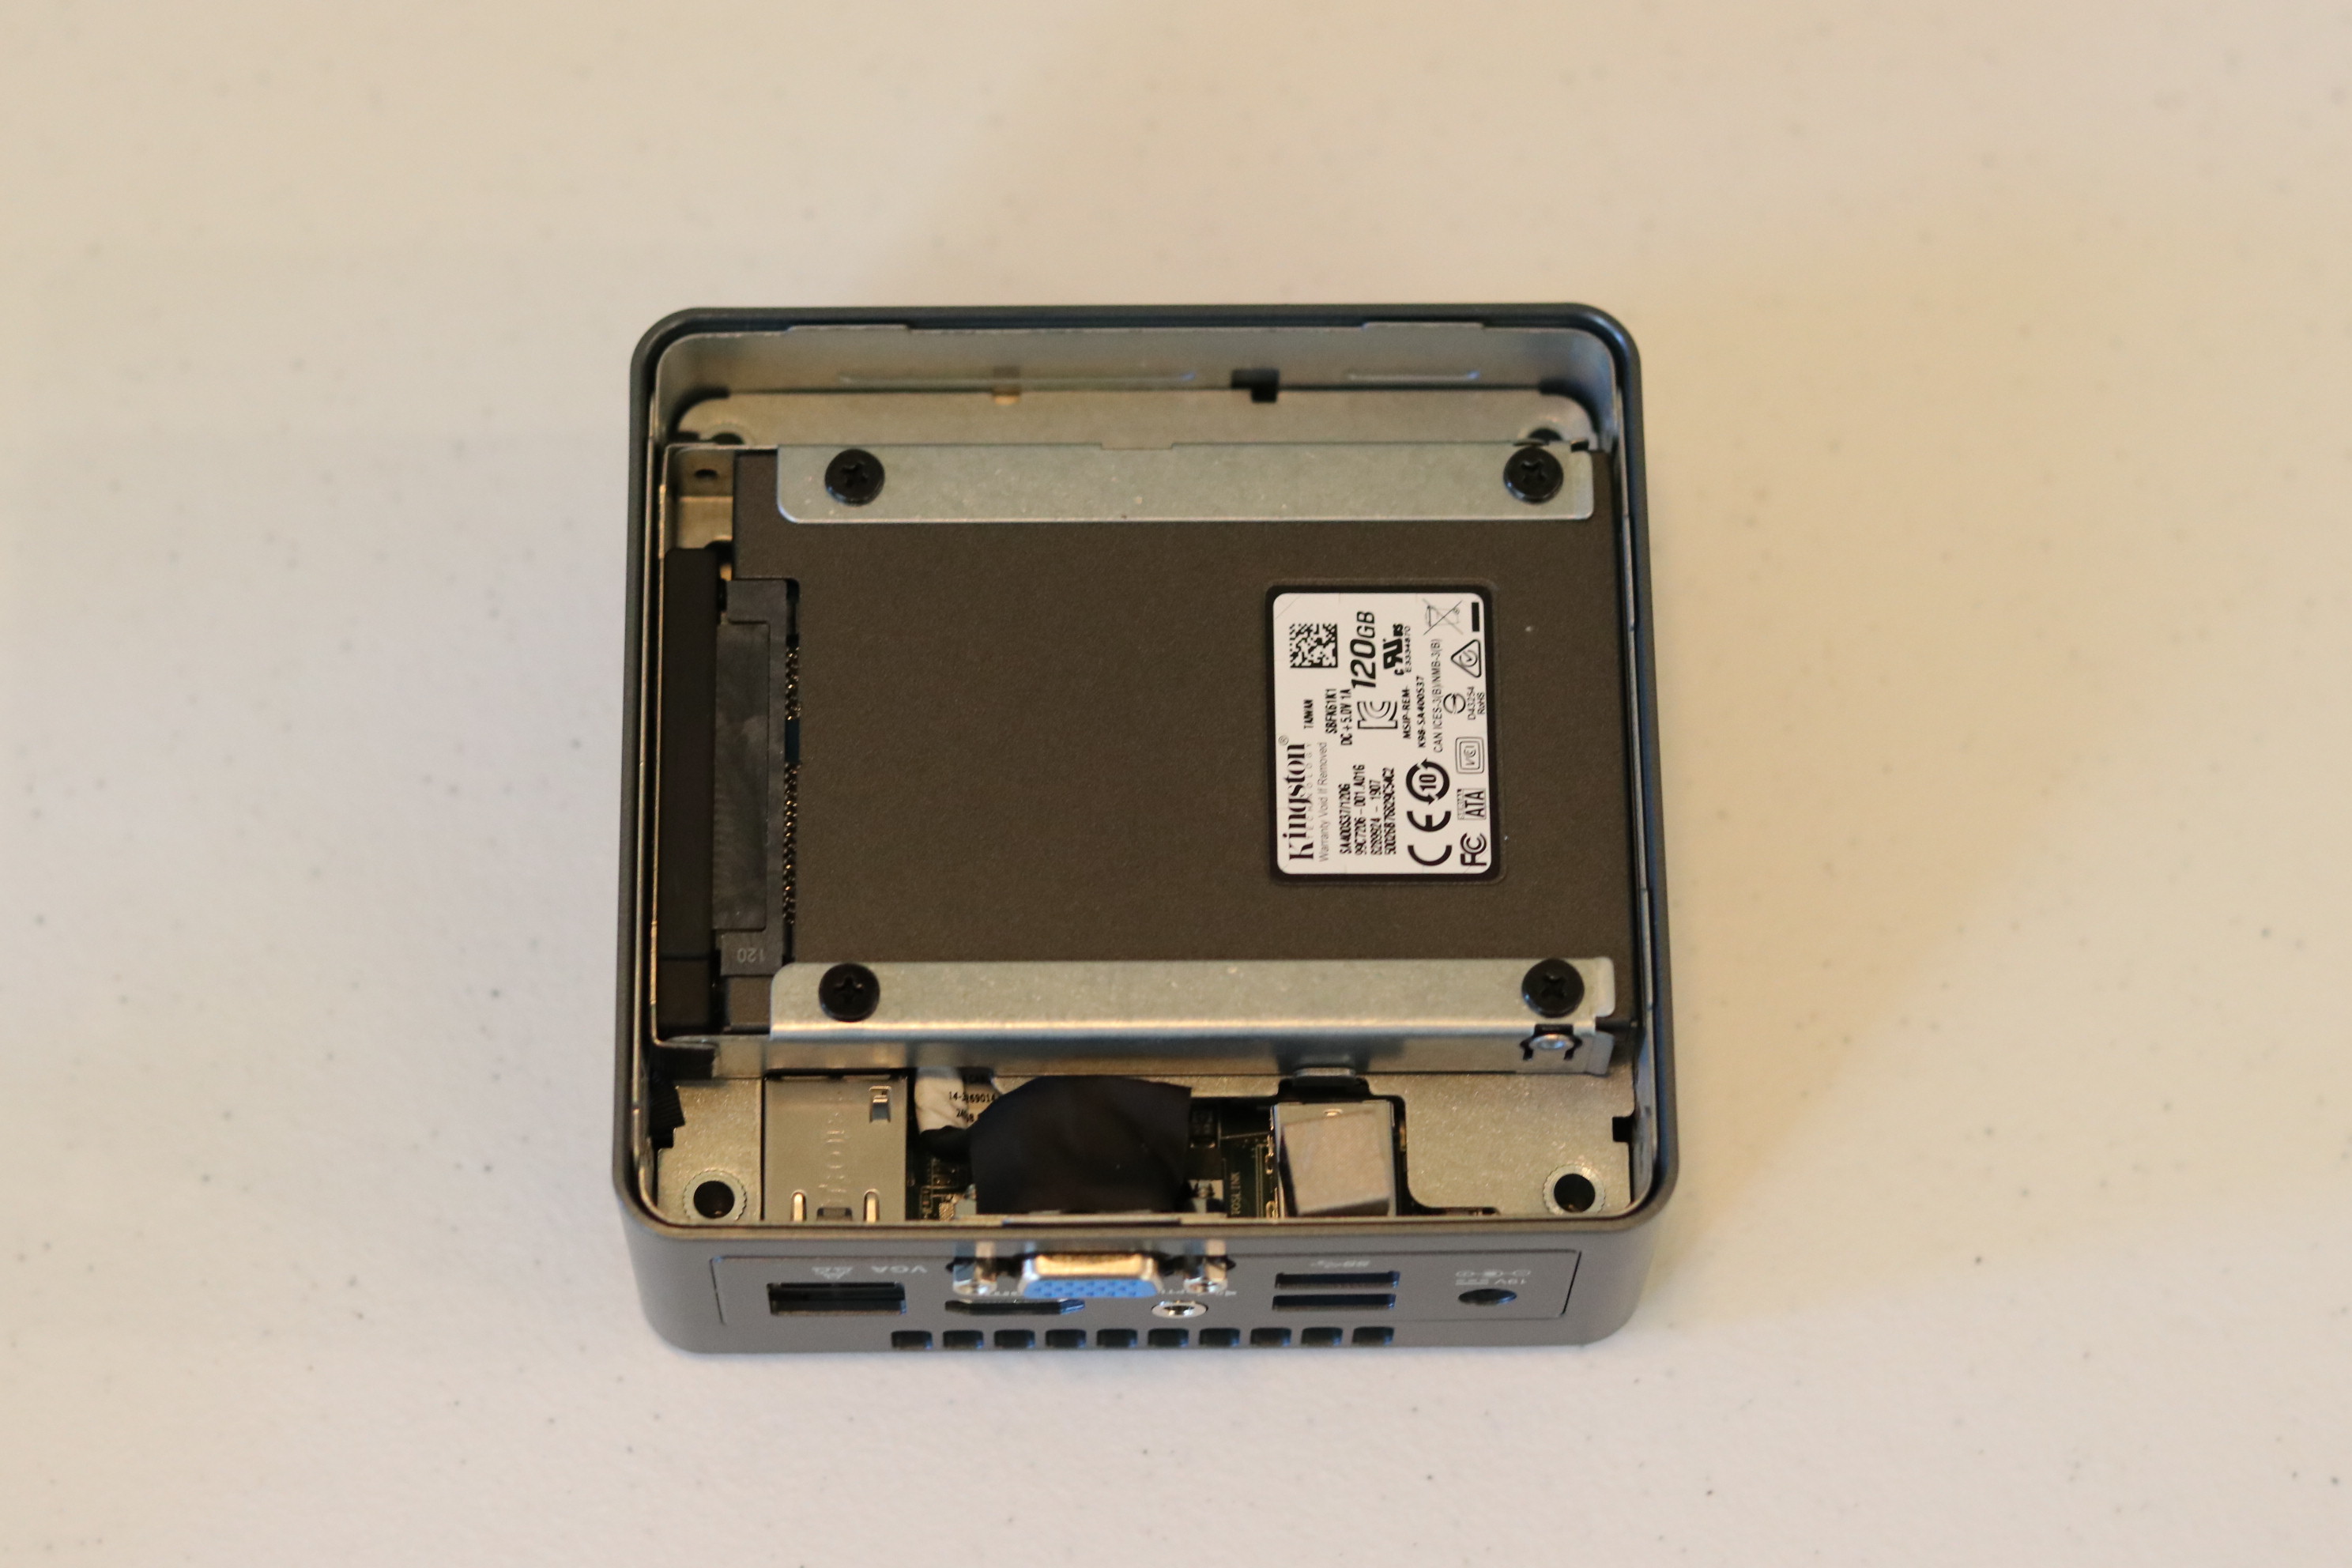
- Kingston 120GB SSD (SA400S37/120G) – $19.95 (Amazon)
 |
 |
 |
 |
 |
 |
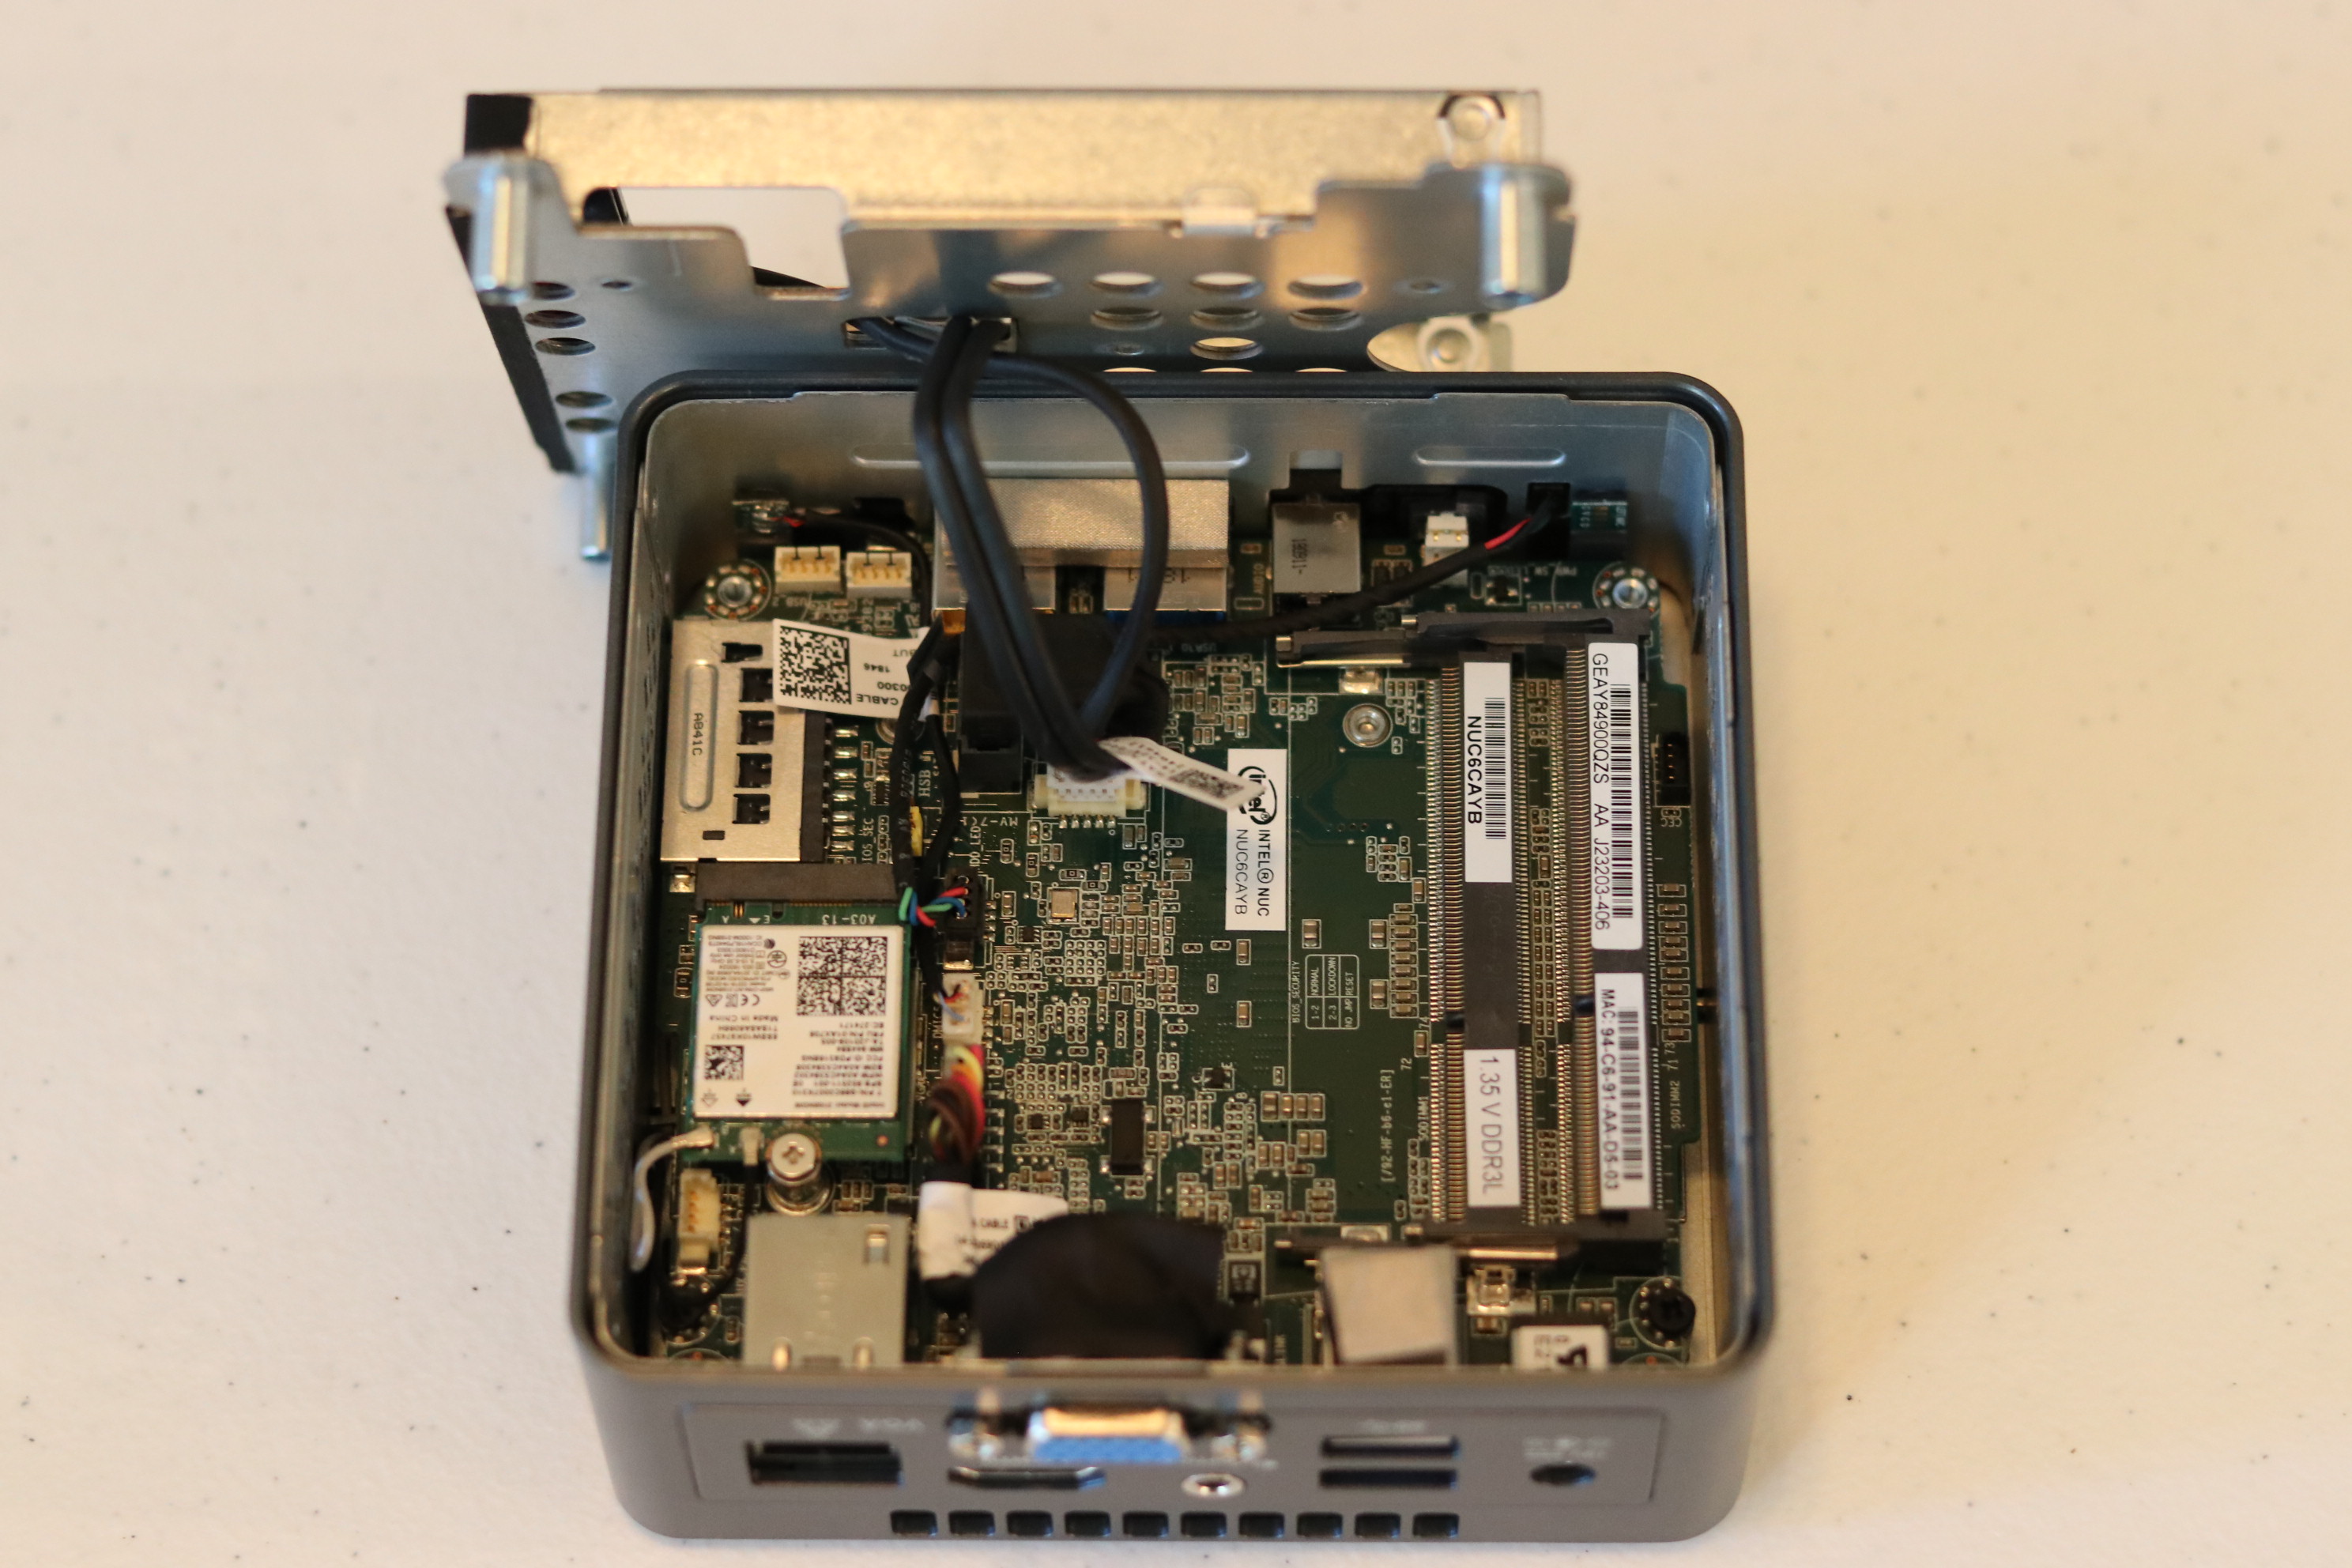
I’ll go into a little bit of my mentality for making these decisions for this build. First, the NUC – like I said before it has proven itself. Regarding its resources, this model sports a Intel Celeron J3455 which has 4 cores, virtualization, 10W of power consumption, and 1.50 GHz to 2.30 GHz. To me, this translates to ‘sips power in idle, is able to ramp up if needed’.
Next is the storage, 120GB SSD. This particular build is really only for one camera, maybe two at the most. I have some of these cameras at my house, and even with some doing full time motion record and others doing a schedule – it still doesn’t go over 50 GB with a moderate retention period. The goal was to keep the price down, but if we have to migrate disks later then we will.
Lastly the RAM, which is only 4GB. This is only one slot, and the max for this model is 8GB. So, if needed, we can double the ram pretty easily for about $25. I’m not worried about that, plus the fact that my own 3 camera system is running on 2GB of RAM.
So that covers the hardware. I also wanted to touch on a few other implementation details. I’m choosing to run this inside of a VM, which is going to give me the ability to snapshot/upgrade/reboot the actual camera system rapidly while keeping the host online. Further complicating things, I’m going to use ZFS as the underlying filesystem for the VM. I chose this mainly because I’ve seen how fragile MongoDB is in general, plus the large number of articles and pages describing Ubiquiti software needing a database repair.
- https://help.ubnt.com/hc/en-us/articles/360006634094-UniFi-Network-Controller-Repairing-Database-Issues-on-the-UniFi-Controller
- https://community.ubnt.com/t5/UniFi-Wireless/Cloud-key-with-corrupt-mongo-db-recovery/td-p/2191962
- https://gbe0.com/networking/ubiquiti/unifi-controller-mongodb-errors
ZFS will make sure that the database does not get corrupted from a dirty shutdown. Since I will not have direct control over this box, and its not sitting in a datacenter somewhere but rather someones living room, I want to give it the most filesystem protection I can so manual intervention is not needed in case of a power outage.
Now that we have the concepts out of the way, lets get to some specifics. I’m calling this machine ‘blackbox’, partly because its a small gray/black cube and also Halo. After completing a standard minimal CentOS install, I gave the OS 20 GB and the swap got 3.7 GB.
[mfox@blackbox ~]$ lsblk
NAME                          MAJ:MIN RM   SIZE RO TYPE MOUNTPOINT
sda                             8:0    0 111.8G  0 disk
├─sda1                          8:1    0   200M  0 part /boot/efi
├─sda2                          8:2    0     1G  0 part /boot
└─sda3                          8:3    0  23.8G  0 part
  ├─centos_sor--blackbox-root 253:0    0    20G  0 lvm  /
  └─centos_sor--blackbox-swap 253:1    0   3.8G  0 lvm  [SWAP]
[mfox@blackbox ~]$ df -h |grep -v tmpfs
Filesystem                             Size  Used Avail Use% Mounted on
/dev/mapper/centos_sor--blackbox-root   20G  1.2G   19G   6% /
/dev/sda2                             1014M  184M  831M  19% /boot
/dev/sda1                              200M   12M  189M   6% /boot/efi
I then used gdisk to add a new partition for the ZFS data:
Number  Start (sector)    End (sector)  Size       Code  Name
   1            2048          411647   200.0 MiB   EF00  EFI System Partition
   2          411648         2508799   1024.0 MiB  0700
   3         2508800        52332543   23.8 GiB    8E00
   4        52332544       234441614   86.8 GiB    8300  Linux filesystem
[mfox@blackbox ~]$ lsblk
NAME                          MAJ:MIN RM   SIZE RO TYPE MOUNTPOINT
sda                             8:0    0 111.8G  0 disk
├─sda1                          8:1    0   200M  0 part /boot/efi
├─sda2                          8:2    0     1G  0 part /boot
├─sda3                          8:3    0  23.8G  0 part
│ ├─centos_sor--blackbox-root 253:0    0    20G  0 lvm  /
│ └─centos_sor--blackbox-swap 253:1    0   3.8G  0 lvm  [SWAP]
└─sda4                          8:4    0  86.9G  0 part
After following the ZFS installation guide for CentOS (https://github.com/zfsonlinux/zfs/wiki/RHEL-and-CentOS) I created the zpool from the new partition.
[mfox@blackbox ~]$ sudo zpool create storage /dev/sda4
[mfox@blackbox ~]$ zpool list
NAME      SIZE  ALLOC   FREE  EXPANDSZ   FRAG    CAP  DEDUP  HEALTH  ALTROOT
storage  86.5G   110K  86.5G         -     0%     0%  1.00x  ONLINE  -
[mfox@blackbox ~]$ zpool status
  pool: storage
 state: ONLINE
  scan: none requested
config:

	NAME        STATE     READ WRITE CKSUM
	storage     ONLINE       0     0     0
	  sda4      ONLINE       0     0     0

errors: No known data errors
[mfox@blackbox ~]$ zfs list
NAME      USED  AVAIL  REFER  MOUNTPOINT
storage  85.5K  83.8G    24K  /storage
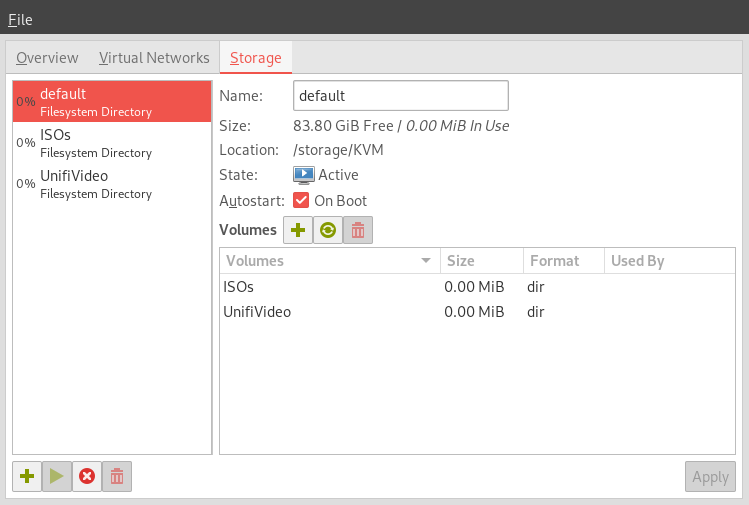
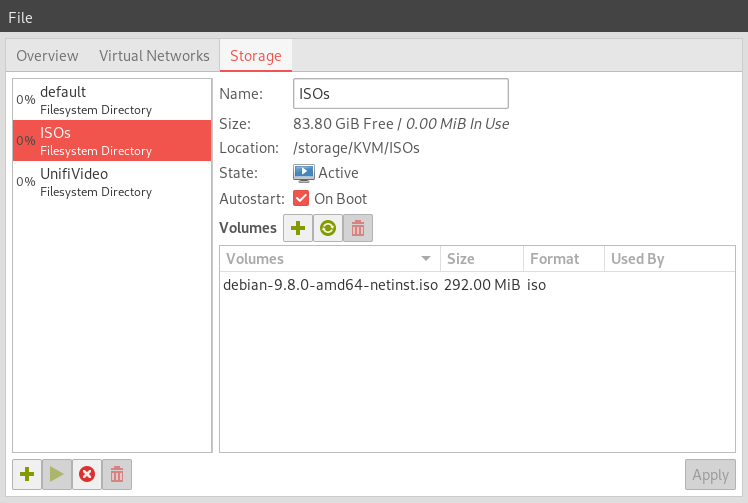
So about 80 GB total of ZFS protected storage. Not bad, and like I said it can be grown in the future by replacing this with a larger SSD and migrating the data if needed. The plan is to use one dataset for KVM (which is where the VM will sit) and the other one will be for NFS, which is where the camera data will be. This will reduce the space needed by the VM for a little complexity trade-off.
[mfox@blackbox ~]$ sudo zfs list -t all
NAME                                   USED  AVAIL  REFER  MOUNTPOINT
storage                                192K  83.8G    25K  /storage
storage/KVM                             48K  83.8G    24K  /storage/KVM
storage/KVM/UnifiVideo                  24K  83.8G    24K  /storage/KVM/UnifiVideo
storage/exports                         48K  83.8G    24K  /storage/exports
storage/exports/UnifiVideoRecordings    24K  83.8G    24K  /storage/exports/UnifiVideoRecordings
Next was the KVM installation:
[mfox@blackbox ~]$ sudo yum install qemu-kvm libvirt libvirt-python libguestfs-tools virt-install
[mfox@blackbox ~]$ sudo usermod -a -G libvirt mfox
[mfox@blackbox ~]$ sudo systemctl enable libvirt-guests
The extra step of enabling libvirt-guests is that the VM will be hibernated in the event of the host reboot or poweroff. (I ended up running into some issues here, you can see them here.)
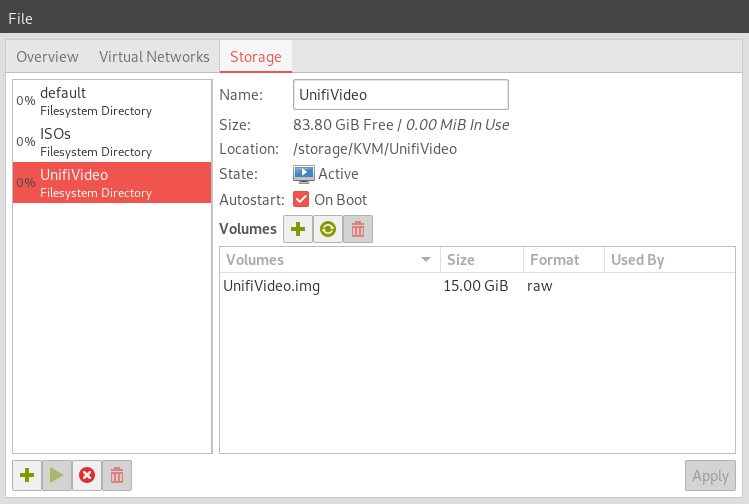
At this point, I am able to use the GUI tool virt-manager on Linux to configure the system. I created a new ZFS dataset for ISOs /storage/KVM/ISOs, and I changed the default storage location to /storage/KVM. Inside the new dataset I created another dataset called UnifiVideo and added that as a storage pool inside of virt-manager. I also manually created a 15GB raw disk image for the VM. I’m using raw because of the ZFS filesystem compression. I downloaded the Debian netinstall ISO using wget, and here are screenshots of the storage section of my virt-manager:
 |
 |
 |
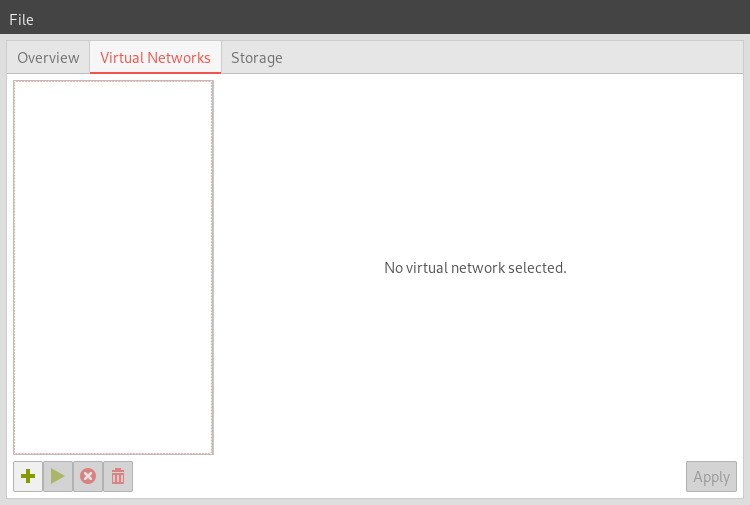
The next hurtle is networking. I want to be able to access this VM like it was another computer on my network. That rules out using the default NAT network settings that KVM uses. Inside of virt-manager I removed the default virtual networks. On the CentOS host a new bridge adapter needs to be created that the VM (and other ones) can attach to. This needs to be done carefully or you’ll lose access to the host after making the changes.
Using the tool nmtui from the CentOS host, I deleted the original interface enp1s0 then created a new bridge with one slave adapter, which I set to ‘enp1s0’ with the same network settings as the original.
Before:
[mfox@blackbox ~]$ ip addr
2: enp1s0: <BROADCAST,MULTICAST,UP,LOWER_UP> mtu 1500 qdisc pfifo_fast state UP group default qlen 1000
    link/ether <REDACTED> brd ff:ff:ff:ff:ff:ff
    inet <REDACTED> brd <REDACTED> scope global noprefixroute dynamic enp1s0
       valid_lft 85752sec preferred_lft 85752sec
    inet6 <REDACTED> scope link
       valid_lft forever preferred_lft forever
After:
[mfox@blackbox ~]$ ip addr
2: enp1s0: <BROADCAST,MULTICAST,UP,LOWER_UP> mtu 1500 qdisc pfifo_fast master bridge0 state UP group default qlen 1000
    link/ether <REDACTED> brd ff:ff:ff:ff:ff:ff
3: bridge0: <BROADCAST,MULTICAST,UP,LOWER_UP> mtu 1500 qdisc noqueue state UP group default qlen 1000
    link/ether <REDACTED> brd ff:ff:ff:ff:ff:ff
    inet <REDACTED> brd <REDACTED> scope global noprefixroute dynamic bridge0
       valid_lft 86394sec preferred_lft 86394sec
    inet6 <REDACTED> scope link
       valid_lft forever preferred_lft forever
Now I am finally ready to create the Debian VM. I am going to walk through each step of the creation process. In virt-manager, under the New VM creation wizard, I am specifying this is a Local install then choosing the ISO from the dataset and pool created earlier. I am going to use 2048 MiB for RAM and 2 CPUs, based on the host hardware. At the storage screen, I am manually specifying the raw disk created earlier. On the last page I am confirming its using the new bridge created on the CentOS host. It should be the only option if the other virtual network was deleted like I did. If everything goes well, you should see the Debian splash page come up on the newly created VM.
Due to the amount of detail I would have to go in to cover absolutely every step I am not going to detail the Debian 9 install steps. Like I said at the top, this is a high level flyby and focusing on the specifics of this environment.
Once the VM is done installing, make sure it has an IP address on your network, as it should. You should be able to ping the CentOS host and the Debian VM from a machine on your network directly by IP. If you are still using NAT on the VM, it will have a IP in the wrong network space.
After the VM is done and rebooted, make sure to fully update it using apt-get update and apt-get upgrade.
At this point I’m ready to install Unifi Video. I will get the download from https://www.ui.com/download/unifi-video/default/default/
At the time of this post the Unifi Download says Debian 7. I am going to be using Debian 9, as I have in the past, and it seems to work fine. Proceed at your own risk.
On the first try, its clear that we need some dependencies:
mfox@UnifiVideo:~$ sudo dpkg -i unifi-video.Debian7_amd64.v3.10.1.deb
[sudo] password for mfox:
Selecting previously unselected package unifi-video.
(Reading database ... 26560 files and directories currently installed.)
Preparing to unpack unifi-video.Debian7_amd64.v3.10.1.deb ...
Installed Version
unifi-video: /var/lib/dpkg/tmp.ci/preinst install
Unpacking unifi-video (3.10.1) ...
dpkg: dependency problems prevent configuration of unifi-video:
 unifi-video depends on psmisc; however:
  Package psmisc is not installed.
 unifi-video depends on mongodb-10gen (>= 2.4.10) | mongodb-org-server (>= 2.6.0) | mongodb-server (>= 2.0.6); however:
  Package mongodb-10gen is not installed.
  Package mongodb-org-server is not installed.
  Package mongodb-server is not installed.
 unifi-video depends on java7-runtime-headless; however:
  Package java7-runtime-headless is not installed.
 unifi-video depends on jsvc (>= 1.0.10); however:
  Package jsvc is not installed.

dpkg: error processing package unifi-video (--install):
 dependency problems - leaving unconfigured
Processing triggers for systemd (232-25+deb9u9) ...
Errors were encountered while processing:
 unifi-video
I happen to know Unifi Video works with Java 8, so I’m not sure why its saying Java 7 as the runtime. I’m going to try and address some of these issues manually. I am using this post for reference, which at the bottom says Java 8. https://community.ubnt.com/t5/UniFi-Video-Blog/UniFi-Video-3-10-1-Full-Release/ba-p/2674717
I’m manually installing these packages: openjdk-8-jre-headless, psmisc, mongodb-server, and jsvc. First I removed the unifi-video package then added the other packages.
mfox@UnifiVideo:~$ sudo dpkg -r unifi-video
mfox@UnifiVideo:~$ sudo apt-get install openjdk-8-jre-headless
mfox@UnifiVideo:~$ sudo apt-get install psmisc
mfox@UnifiVideo:~$ sudo apt-get install mongodb-server
mfox@UnifiVideo:~$ sudo apt-get install jsvc

mfox@UnifiVideo:~$ sudo dpkg -i unifi-video.Debian7_amd64.v3.10.1.deb
Selecting previously unselected package unifi-video.
(Reading database ... 27375 files and directories currently installed.)
Preparing to unpack unifi-video.Debian7_amd64.v3.10.1.deb ...
Installed Version 3.10.1
unifi-video: /var/lib/dpkg/tmp.ci/preinst install 3.10.1 3.10.1
Unpacking unifi-video (3.10.1) ...
Setting up unifi-video (3.10.1) ...
unifi-video: /var/lib/dpkg/info/unifi-video.postinst configure
postinst.configre: update /usr/lib/unifi-video/logs symlink to /var/lib/unifi-video/logs
postinst.configure: update /usr/lib/unifi-video/data symlink to /var/lib/unifi-video
Processing triggers for systemd (232-25+deb9u9) ...
Finally it took the install. At this point, I was able able to hit the interface in a browser using https://<IP>:7443 and start the install wizard. I’m not going to cover the install or configuration of Unifi Video, perhaps another post. The next steps here will be to configure the NFS storage where the video files will go. I am using NFS so that the VM is lightweight and the large files are stored outside of a disk image.
I have two options here, after creating the NFS server on the host I can point the VM to the host’s normal IP. The traffic would leave the VM but not the host, the network bridge would act like a switch so the traffic would stay local. That means from the VM, I would need to know that the host’s IP wouldn’t change. That’s easy to control, however there is one other method that is safer.
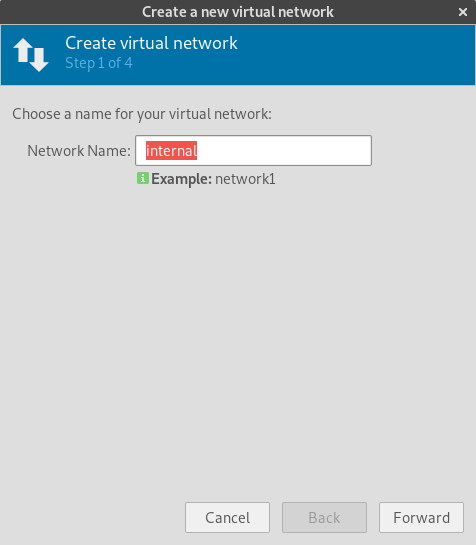
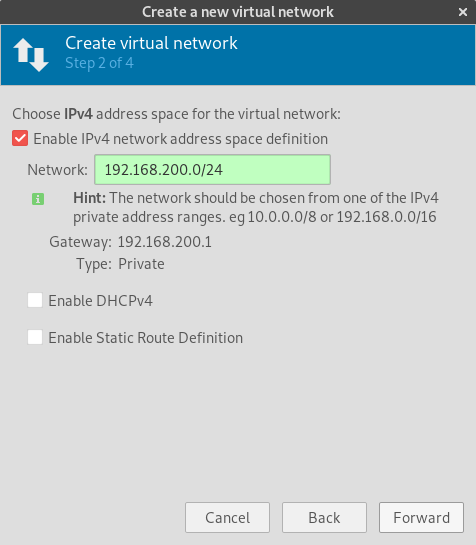
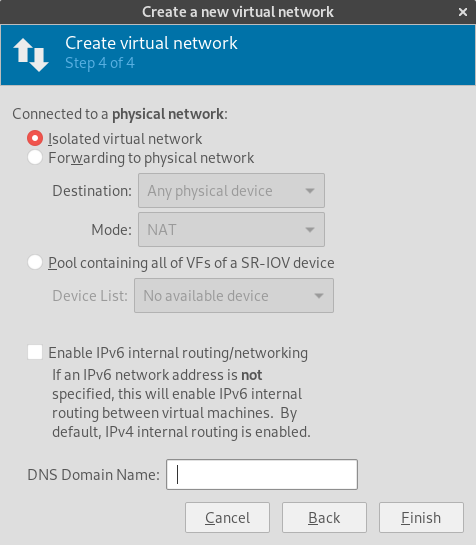
I am going to make a new private network between the host and the VM, where I can set a static IP on both and I know will never change. Externally the IP to the host can change, or the VM, but that NFS connection would stay the same using that static internal network.
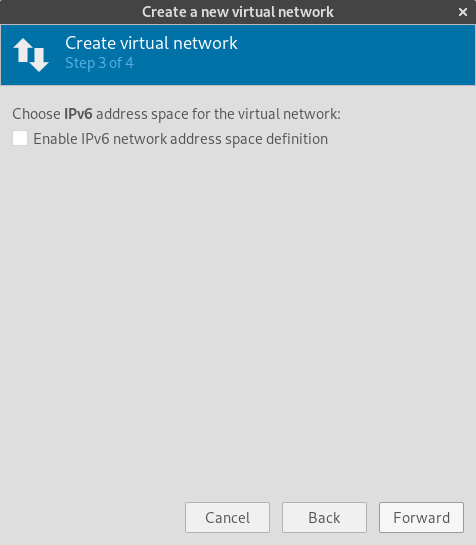
This network creation can be done completely from the virt-manager GUI:
 |
 |
 |
 |
 |
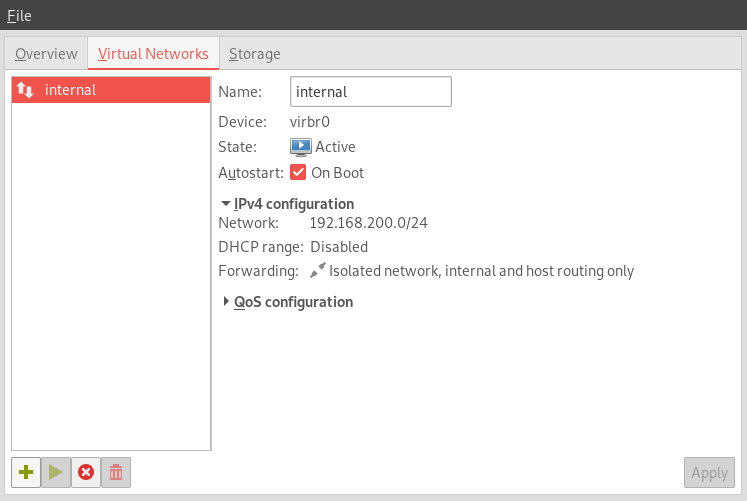 |
This is how it looks from the host:
5: virbr0: <NO-CARRIER,BROADCAST,MULTICAST,UP> mtu 1500 qdisc noqueue state DOWN group default qlen 1000
    link/ether <REDACTED> brd ff:ff:ff:ff:ff:ff
    inet 192.168.200.1/24 brd 192.168.200.255 scope global virbr0
       valid_lft forever preferred_lft forever
The next step is to add the interface to the VM and create a static IP inside the Debian VM. I’m going to use 192.168.200.2. I added the following code to /etc/network/interfaces based on the interface name in the VM:
allow-hotplug ens9
iface ens9 inet static
address 192.168.200.2
netmask 255.255.255.0
A quick reboot of the VM confirms the new network works, and checking the routing table confirms that the new interface is not the default gateway. Now to configure NFS.
Host:
sudo yum install nfs-utils
sudo systemctl enable nfs-server
sudo systemctl start nfs-server
sudo firewall-cmd --add-service=nfs --permanent
sudo firewall-cmd --reload

sudo vim /etc/exports
========================================
storage/exports/UnifiVideoRecordings    192.168.200.2(rw)

sudo exportfs -r
Debian VM:
sudo apt-get install nfs-common
sudo mkdir /mnt/UnifiVideoRecordings
sudo chattr +i /mnt/UnifiVideoRecordings/

sudo vim /etc/fstab
========================================
192.168.200.1:/storage/exports/UnifiVideoRecordings /mnt/UnifiVideoRecordings nfs hard,intr,_netdev,noexec 0 0

mfox@UnifiVideo:/mnt$ df -h |grep Unifi
192.168.200.1:/storage/exports/UnifiVideoRecordings   83G     0   83G   0% /mnt/UnifiVideoRecordings
A few liberties were taken here, which I’ll describe now. On the host, first the NFS packages were installed and the NFS server daemon was enabled and started. After that, the firewall was configured to permanently allow NFS traffic inbound to the host. The /etc/exports file on the host defines each NFS export.
On the Debian VM, we are creating the mountpoint for the NFS mount. I always set my mounts as immutable, so if they are not mounted the mountpoint directory should not be writable. After defining the mount in the /etc/fstab file, it should be manually mountable. It should also persist reboots. Options hard and intr mean that connections to the NFS server will not timeout unless a user tries to interrupt them. If the NFS server goes down, the client will be pending retry forever – but this is interruptible. The _netdev option tells Debian that this is a network filesystem and the network needs to come up first before attempting a mount. The noexec option tells the the local machine (Debian VM) not to allow files to be executable on this mount.
Last part of the NFS setup, the NFS filesystem needs to have the proper ownership for Unifi Video to write to it. On the Debian VM I checked the user like this:
mfox@UnifiVideo:~$ cat /etc/passwd |grep -i unifi
unifi-video:x:108:112::/usr/lib/unifi-video:/bin/sh
On the CentOS host I then ran the following command:
[mfox@blackbox exports]$ sudo chown 108:112 UnifiVideoRecordings/
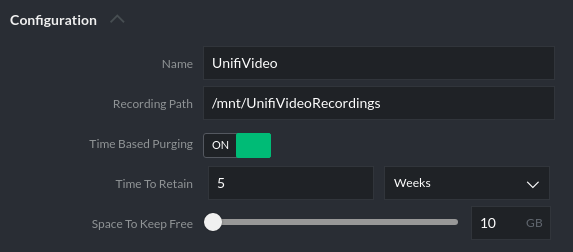
Now the unifi-video user should be able to write to the filesystem. The very last step is to set this directory in the Unifi Video interface. Under System Configuration:
A quick recording test confirms that Unifi Video can write to this directory, so that means everything is working.
With complex projects like this its best to try and have a reproducible test for each step. Make sure each step works independently, because usually everything builds on each step. You don’t want to get to the end and see that nothing works.
Another successful use-case for the Intel NUC. Remember, this is not a full guide – if you were able to follow along that is awesome, however taken at face-value these are not step-by-step instructions.